SWAGE AND SHAPER TROUBLESHOOTING GUIDE
| Previous Page | Table of Contents | Next Page |
SET SWAGE UP ACCORDING INSTRUCTIONS FOR INITIAL SET-UP, HAND or AIR
Refer the Band Saw Troubleshooting Guide to ensure proper set-up of the sharpener.- Check feed finger and face plate alignment/wear.
- Make sure the saw isn't sitting too high in the filing clamp or sharpener gate.
NOTE: About 1/2 of all tooth bending/uneven swaging problems result from grinding off-center or out-of-square.

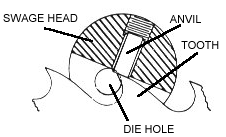
- Make sure the anvil is absolutely square. (Anvils should be reground only at the Armstrong factory.)
- Set the anvil to the right height with the correct anvil setting gauge. The number of the gauge and die should match.
- Check for wear. Replace the anvil if wear exceeds .001"- about the smallest amount you can "feel,"
- Check the position of the anvil to the saw tooth. Adjust the anvil to be flat on the back of the tooth by rotating the swage head forward or backward.
- Anvils ground with back clearance cannot be set with anvil setting gauge. (See section on high back teeth.)
NOTE: Slippage can occur from pitch build up in clamp screws. Pitch packed in the stationary clamp screw causes the tooth to bend toward the moveable clamp screw side. (Reverse is true of pitch in moveable clamp screw.)
- If it is worn-out, replace it. If just one area on the die is worn, move it over to a "fresh" spot (at least 1/4" or 6mm).
- Too much bite? Reset the back stop to reduce bite.
- Is your die too big? Too small? Maybe you need a different swage size. See the Swage and Shaper Selector Chart.
- Use the appropriate "style" or "bite" of die for your application. (See Die Selection Chart.)
- Is the die hole in the head worn?
- Check for wear in the die "lock" or stop bracket. The die should be held firmly and not allowed to "slide" inside the head.
QUICK CHECK: is chamfer around the die hole a uniform width. Worn swage heads will have less chamfer 180 degrees from the anvil.
- Make sure the saw teeth are not bent before swaging.
- Check to see if the saw was ground off-center (face or back).
- Is the guide arm of the swage in line with the swage head? Check by lightly clamping a straight edge with the clamp screws. The straight edge should center between the "ears" at the front of the guide arm. Bend the guide arm as necessary until the straight edge centers when clamped with new clamp screws.
- Are you swaging beyond the end of the filing clamp? Swaging a "flexed" or unclamped saw will cause tooth bending or uneven swaging.
- Shaper jaws should be aligned, parallel and the ends should be flush.
- Shaper jaws should always be a matched pair and should be correctly ground.
- Be sure the saw is properly aligned down the center of the shaper.
| Previous Page | Table of Contents | Next Page |