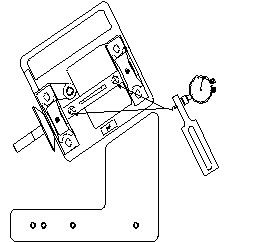
Using the Precision Grinding Wheel Arbor Alignment System

arboralignsys.gif (3508 bytes)

(P/N 14646)

Clean & Inspect the Sharpener Replace Worn Parts First

 
  1. Check cone screws and bushings on the feed finger arm and the rocker head. These cone screws and bushings should be replaced every year. Torque cone screws as instructed on page 18, question 5 of the Armstrong Band Saw Troubleshooting Guide (P/N 11103) included with this gauge.
  2. The old style rocker arm assembly may need to be replaced after 6,000 to 10,000 hours of operation (usually 10 to 15 years of moderate usage -- about 2 to 3 hours per day). The current, heavy duty rockers with replaceable feet will usually last 50% longer before replacements is needed. See page 13 of the Troubleshooting Guide for more about rocker arm replacement.
  3. Remove the grinding wheel and, with a magnetic base dial indicator, check the arbor collar for run-out. Run-out should not exceed .003" (.075 mm). Replace the arbor or bearings as needed if more than .003" run-out is indicated. Inspect the arbor drive belt and both pulleys. Replace all worn parts.
  4. Clean the faceplate as needed and inspect for proper installation and wear, using a straight edge. Old style steel faceplates tend to wear "hollows" under the hold down rollers and should be replaced with new, self-cleaning carbide faceplates. Improperly installed faceplates on No. 4 and 6 sharpeners may be bowed or twisted on the sharpener. The hold down screws on these faceplates should be snug but not too tight.
Align the Faceplate to the Feed Arm & Head Travel
  1. Follow the instructions on page 4 of the Troubleshooting Guide to align the faceplate to the feed arm. Do this before making any other adjustments to the faceplate.
  2. Plumb the faceplate to the grinding head travel. Attach a magnetic base dial indicator to the grinding wheel guard and lift the grinding head to sweep the faceplate. Adjust the faceplate so it is parallel with the grinding head travel. It is very important that the faceplate is exactly in line with the travel of the rocker head.
  3. Re-check alignment of faceplate to feed arm travel after adjusting the plumb of the faceplate (step 5).
 

Align the Arbor to the Faceplate Last


  1. Remove cap screws from each end of the faceplate. Do not remove faceplate. Attach the arbor alignment plate over the faceplate with the screws and washers provided. Tighten securely.
  2. Lower the grinding head until the arbor is close to the plate, but do not touch the plate with the pulley.
  3. Set the arbor alignment dial indicator gauge so that it reads zero when resting on the chrome alignment plate. Allow only the magnets to hold the gauge on the plate for the most consistent readings.
  4. Using the dial gauge provided, measure the arbor at points marked by an � (about 1/2" or 10 mm inboard of the bearing) on the drawing at the top of the previous page. Allow only the magnets to hold the gauge on the plate for the most consistent readings.
  5. Both measurements must match the chart shown for the saw that will be sharpened. For example, if a 16 gauge (.065" or 1.65 mm) saw is to be sharpened the gauge should read .0830" (2.08 mm) on each end of the No. 4 sharpener arbor. NOTE: See page 19 of the band saw sharpener troubleshooting guide, item #2 about aligning the faceplate for two saw thicknesses.
  6. Move the arbor carriage as needed. NOTE: Do NOT adjust the cone screws to align the arbor. Refer to page 5, steps 3 & 4 in the Band Saw Sharpener Troubleshooting Guide.

Saw Thickness

Gauge Reading


No. 4 & 6 Sharpeners

Gauge

Inch

mm

Inch

mm

ZERO

0

0

.050

1.27

21

.032

0.81

.066

1.68

20

.035

0.89

.068

1.71

19

.042

1.07

.071

1.80

18

.049

1.24

.075

1.89

17

.058

1.47

.079

2.01

16

.065

1.65

.083

2.10

15/16

.068

1.73

.084

2.13

15

.072

1.83

.086

2.18

14/15

.078

1.98

.089

2.26

14

.083

2.11

.092

2.32

13/14

.089

2.26

.095

2.40

13

.095

2.41

.098

2.48

13/12

.102

2.59

.101

2.57

12

.109

2.77

.105

2.65

11

.120

3.05

.110

2.79

Alignment plate thickness = .450" (11.43 mm)

Gauge reading = (arbor diameter + saw gauge)/2 - alignment plate thickness


Copyright(c) 1998-02, Armstrong Mfg. Co., All Rights Reserved
5504 S 11th St Ridgefield, WA 98642
voice: 800-426-6226  fax: 800-513-2529
e-mail: insidesales@burtonmill.com

new products | publications | equipment
sales | training & events | contact us | home